
Lure Making
PikeAngler :: Fishing :: Pike Fishing
Page 1 of 2 • 1, 2 ![]()

Lure Making
![]() tootall Wed Feb 18, 2009 8:55 pm
tootall Wed Feb 18, 2009 8:55 pm
I don't admit to being any good at it, but i had a thought the other night that i couldn't afford to buy or even really find what lure i wanted-so why not have a crack at making one myself?
I tried to take pics as i went along to make things easier to understand.
So...
I started with a 7" block of hardwood (unknown!) i found and shaped the body using a dremmel and hand sanding:

Next I knew i wanted a rattling lure, so i decided to cut the wood down the middle:

I then made a hollow for a couple of ball bearings. I also needed some weight up front to counter act the buoyancy of the wood, so i found a small lead weight and made a recess for that too. You'll also notice how I've made a channel for the wire/swivels and hooks i used later.


Here it is held back together:

Next i had to figure out how the hooks/mainline atachment ring were going to be made - i decided to use some carboflex, crimps and swivels to do what i needed to:

These bits were a bit fiddly!


So the final internal trace ended up like this:

Here it is with weight, rattle and internal trace:

And with the other half in place ready to epoxy together:

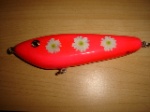
Thats about as far as i've got so far. Need to paint it up (probably a perch pattern) and give it several coats of yacht varnish then it'll be getting there. Will post more as i do it.
PS i wrapped it in electrical tape and put it in the sink to see how it sat and what the sink rate was like and i have to say i'm well chuffed so far
tootall- Posts : 1339
Join date : 2009-01-29
Age : 47
Location : Beverley, East Yorkshire
Re: Lure Making
![]() nickcarpy Wed Feb 18, 2009 8:58 pm
nickcarpy Wed Feb 18, 2009 8:58 pm

nickcarpy- Posts : 1717
Join date : 2008-11-03
Age : 51
Location : hatfield doncaster
Re: Lure Making
![]() noodle Wed Feb 18, 2009 10:00 pm
noodle Wed Feb 18, 2009 10:00 pm
look no further
http://www.tackleunderground.com
have you glued it all together again?
if not get rid of the carboflex and use 1.6-3mm stainless wire its far more durable
to fill the holes try P40 compound or milliput (i love the stuff)
and to seal it before you paint it thompsons water seal, this can react with some paint though
a couple of tips i will pass on
to get it really smooth before you seal it wet it then let it dry then sand it again with finer papers
yacht varnish will be better thined and used as a sealer on the wood then over paint a clear laquer spray will be better for the final touch (etex gives the best results but may be a bit too much starting out)
to make rattles bb's and metal tubing work very well
insted of twisting bits of wire but the long screw eyes form places like fishing pool or diy lures and flies
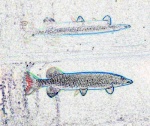
a few ive made to follow
Last edited by noodle on Wed Feb 18, 2009 10:10 pm; edited 1 time in total
noodle- Posts : 1385
Join date : 2008-08-29
Age : 48
Location : nwest england -

Re: Lure Making
![]() tootall Wed Feb 18, 2009 10:02 pm
tootall Wed Feb 18, 2009 10:02 pm
noodle wrote:making lures????
look no further
http://www.tackleunderground.com
have you glued it all together again?
if not get rid of the carboflex and use 1.6-3mm stainless wire its far more durable
No mate - not glued it yet - cheers for advice on thw wire
tootall- Posts : 1339
Join date : 2009-01-29
Age : 47
Location : Beverley, East Yorkshire
noodle- Posts : 1385
Join date : 2008-08-29
Age : 48
Location : nwest england -

noodle- Posts : 1385
Join date : 2008-08-29
Age : 48
Location : nwest england -
Re: Lure Making
![]() tootall Wed Feb 18, 2009 10:40 pm
tootall Wed Feb 18, 2009 10:40 pm
Cheers for all the tips - i did the one with the water/sanding already. Something I remembered fron CDT lessons at school years ago
Where do you get that etex from and why is it difficult to use?
Good tip about the tube for the rattle - will try that on my next one. This one does give off a good sound tho as the bearing nearest the weight bangs against it adding to the effect.
Finding that the split rings for the hooks are a pain in the rs to get on the swivels tho!
tootall- Posts : 1339
Join date : 2009-01-29
Age : 47
Location : Beverley, East Yorkshire

tootall- Posts : 1339
Join date : 2009-01-29
Age : 47
Location : Beverley, East Yorkshire
Re: Lure Making
![]() noodle Wed Feb 18, 2009 10:53 pm
noodle Wed Feb 18, 2009 10:53 pm
aerosol?
or acryllics?
for aerosols in limited colours the local wilkinsons will have cheap versions of plasticote type paints, but the basics and top up with the plasticote ones, or try halfors etc
dont use an airbrush myself so cant help
hand painting can give some extra texture and definition to a lure
the etex or other two pack style epoxies takes a while to cure and to get the best results you need a drying wheel, or at least a means of turning the lure so the epoxy doesnt settle (im given to understand this by a couple of decent lure builders who laughed at my jobs
noodle- Posts : 1385
Join date : 2008-08-29
Age : 48
Location : nwest england -
Re: Lure Making
![]() tootall Wed Feb 18, 2009 10:59 pm
tootall Wed Feb 18, 2009 10:59 pm
I won't be airbrushing yet - i don't have the kit so i want to see if i'm any good at making them swim and dive in the way i want first before i think about splashing out on that sort of kit.
I've done a bit of airbrushing before whan i had my motorbike so i know i'm capable, but the idea is to keep it cheap so i'll be sticking to hand painting for now
tootall- Posts : 1339
Join date : 2009-01-29
Age : 47
Location : Beverley, East Yorkshire
lures and spinners
![]() pikeing pirates Wed Feb 18, 2009 11:35 pm
pikeing pirates Wed Feb 18, 2009 11:35 pm
pikeing pirates- Posts : 42
Join date : 2008-12-12
Age : 61
Location : hull east yorkshire
Re: Lure Making
![]() tootall Thu Feb 19, 2009 8:17 am
tootall Thu Feb 19, 2009 8:17 am
tootall- Posts : 1339
Join date : 2009-01-29
Age : 47
Location : Beverley, East Yorkshire
Re: Lure Making
![]() Andy Macfarlane Thu Feb 19, 2009 7:11 pm
Andy Macfarlane Thu Feb 19, 2009 7:11 pm
Click HERE for Swedish Lures - An eye-opener on how lures can look with a bit of care


Click HERE for LureMaking.com - Your source for in-depth lure making information - The best Canadian luremakers site
Click HERE for LureBuilding 101 - Lots of Tips and Tricks from some of the best
Click HERE for Nick Green's DIY Lures 'N' Flies - Lure Parts - Highly Recommended
Manual for Envirotex Lite By Divani
In this article I will elaborate on the best way to use of Envirotex Lite and what to do in case you encounter some problems along the way. Envirotex Lite is a two component epoxy lacquer that will harden to a high gloss, rock hard and scratch resistant finish. When you open the package you will notice that two plastic cans and a manual are included. The two cans contain ‘resin’ and ‘hardener’. Before you start, read the manal carefully. It contains a lot of useful information. You can also find this manual on www.lurebuilding.nl under ‘techniques’, then click on the topic ‘finishing’. You can obtain a measuring cup with most packages. This cup measures both in milliliter and ounces. I will now explain how to use Envirotex Lite.
Necessary items:
- 1 package of Envirotex Lite
- 1 cheap brush with a width of 2,5cm to 3cm
- A measuring cup or something similar with flat sides and a flat bottom
- A cheap plastic cup
- A flat stick to mix the two components
How to use this product:
1) For a jerkbait with an average size of 15cm, you will need approximately 5ml of lacquer. This means 5ml of mixed components. For smaller lures you will obviously need less lacquer, for larger baits you’ll need more lacquer. You need to find out how much lacquer you will have to make by using the good old method of trial and error. It is better to make too much lacquer than too little. Mixing more lacquer while you are coating baits equals asking for trouble! When I talk about lacquer, I mean mixing the two components in a 1/1 scale. When you mix 5ml of lacquer, you will need 2,5ml of resin and 2,5ml of hardener. You need to measure two equal shares of each component. If you want to make 100ml of lacquer, you will need exactly 50ml of resin and exactly 50ml of hardener. It is difficult to mix a small amount of lacquer so make sure you need to coat several baits in one go.
2) Take the measuring cup or a similar cup with flat sides and a flat bottom. Only this type of cup is suitable for mixing Envirotex Lite because it is of the utmost importance to mix the two components properly. Let us continue with the exemplary amount of 100ml of lacquer. Measure exactly 50ml of resin in the measuring cup. The next thing to do is to add exactly 50ml of hardener in the same cup. Take the mixing stick. In the original manual you are advised to use a wooden stick that you find in certain ice creams. I use a plastic mixing stick from a kit for mixing epoxy glue. The mixing stick has to be flat and thin, that’s the main thing.
3) After you joined both components, you have about 25 minutes before the lacquer hardened too much to be able to brush it on the lure. Therefore it is important that you know what to do next by heart so you won’t loose any time. Take the mixing stick and start to mix the lacquer thoroughly by stirring and scooping through the lacquer. Don’t forget to scrape the sides and the bottom properly. Stir thoroughly and at a good speed. It’s very important that all the lacquer is mixed properly. If some part of the mixture hasn’t been mixed properly, you might end up brushing pure resin or hardener on your lures. This simply won’t harden so the lure will be ruined. I stir and scrape during 3 minutes at a good pace. You will notice that the lacquer is no longer clear and that an abundance of air bubbles starts to appear in the lacquer. This is normal. This means that the two components are reacting with eachother.
4) Take the cheap plastic cup and pour the lacquer from the measuring cup into the plastic cup. Put the measuring cup upside down on a news paper or a piece of cardboard. Leave it like this until the lacquer has hardened fully. When the lacquer has hardened, you can easily remove whatever is left of the lacquer in the measuring cup so you’ll be able to use it again. Take the mixing stick and stir the mixture in the plastic cup for another two minutes. Clean the mixing stick with a piece of cloth so you can use it again afterwards. The mixture is ready to be brushed on the lures. The next thing you’ll need to do is take the brush. Why do I use a cheap brush? Well, it is near impossible to clean the brush after having used it to brush epoxy lacquer on baits. The lacquer becomes really hard so the brush becomes useless after having used it once.
5) You need to fit the lures with stick-on eyes and screw-eyes before you start to lacquer the baits. I make S-shaped hangers from steel wire (used for jerkbait leaders) to hang the lures away and to be able to handle them while lacquering the baits. Apply a thick coat of lacquer on the lures and make sure every spot on the lure has been covered with lacquer. Now hang the jerkbait away to allow the excess lacquer to drop from the lure. You will notice the air bubbles will start to appear after you hung the lures away on a rack. Again, this is normal. Just continue on the next few lures. I usually lacquer a batch of 20 baits in one go. A short calculation will make things a lot clearer: 20x 5ml per jerkbait equals 100ml. I divide these 20 jerkbaits in four batches of five lures. This needs to be explained. I brush lacquer on five baits first and then I hang them away on a rack to allow the excess lacquer to flow from the lure. Then I start on the second batch of five baits. I hang them on the rack, just like I did for the first five lures. I take the first five baits again and exhale on them to make the air bubbles burst. Only by exhaling on the baits will the bubbles burst. The CO2 in your breath will make the air bubbles burst. Don’t blow hard on the baits, simply exhale. The lacquer will fill any holes that might appear when an air bubble bursts. This is one of the good qualities of Envirotex Lite. Next I start on the third batch of five baits and I exhale on the second batch of five baits.
6) I continue doing this until all the baits have been handled and hung away on the rack to allow the lacquer to harden properly. Make sure all of this happens in 20 minutes time. Once you know what to do, you’ll make it in less than 20 minutes. Lacquer might flow from the lure during the next few hours so make sure you put some old news papers underneath the drying rack. Make sure you mix enough lacquer. I can’t stress this enough: DO NOT try to get the last bit of lacquer out of the plastic cup to coat one extra lure. Often the lacquer on the sqides and on the bottom is mixed less well than in the middle. To make sure you won’t get into trouble, never scrape the last bit of lacquer out of the cup. Try to avoid contact between the brush and the sides and bottom as much as possible.
7) Now it’s time to hang the lures away in a dry, well ventilated and dust free room where the room temperature is about 20°C. Envirotex Lite doesn’t smell at all so you can hang the lures to dry in a room. Often a garage is too damp and too cold. 20°C is about the ideal temperature to allow the envirotex to harden. Warmer is ok, colder is to be avoided. The colder it is, the longer it takes for the lacquer to harden and the larger the risk will be that the lacquer doesn’t harden 100%. A dry room is necessary because moisture in the air hampers the hardening process. A dust free room is important for the end result. Dust particles that end up on the lacquer while the lacquer is hardening can’t be removed. It has little to do with the hardening process but more with the looks of the bait when the lacquer has cured properly. It would a crying shame that your lure would be ruined right at the end of the building process.
9) After two days you can touch the jerkbaits. If the touch feels dry and hard, you can open the screw-eyes by using a drill bit or a pair of scissors. I use a drill bit and the point of a pair or scissors. To remove some smaller bits I use a sharp knife. Be careful when you try to open the screw-eyes. I have had it happen repeatedly in the past three years that either the knife or the point of the pair of scissors ended up in my hand when I wasn’t paying attention.
So, now you know how to use envirotex lite. I will now list some frequently encountered problems and what to do to solve them. Sometimes there is no other option than to sand down the blank again and to start all over but in some cases it can be avoided.
1) “The lacquer hasn’t hardened after 48 hours or hasn’t hardened all oer the jerkbait”. The most obvious reasons are:
- You didn’t mix the components long or thoroughly enough or you forgot to scrape the sides and the bottom of the measuring cup.
- You didn’t mix the components in a 1/1 scale
- You scraped the last bit of lacquer out of the plastic cup
- The room temperature was too low
- The room where you hung the baits to dry was damp and insufficiently ventilated
There is very little that you can do to solve this problem. The way I see it, there are two options. Number one is to remove everything from the lure and start all over again. The second option is to use a piece of waterproof sanding paper to roughen the surface and to add a second coat of lacquer. Make sure that everything has been mixed properly this time.
2) “Air bubbles remain after the lacquer has hardened”.
- I can advise you to check the lures up to about an hour after the last bait has been lacquered. When you discover new air bubbles, exhale on the lure until they disappear. The longer you wait to do this, the less likely it is that you will manage to remove the air bubbles. It’s not the heat from your breath that makes the air bubbles burst but the CO2 in your breath. Don’t try to remove them with a lighter or matches. The flame might blacken the lacquer. Then you will be forced to start all over again …
3) “I want to add glitters to the lacquer”.
- If you want to add glitters to the lacquer to make the finished lure a little more attractive, you should use micro glitters. You can buy small plastic cans with these glitters in most hobby stores. These glitters are so small that they can hardly be felt after the lacquer has hardened. You can even create special effects by adding several different colors of glitters to the lacquer. Don’t use too much glitters bebcause this upsets the consistency of the lacquer. Add the glitters after you have mixed the two components of the envirotex lite.
4) “How about adding multiple coats of envirotex lite?”
- In general it suffices to add only a single coat. Should you have missed a spot, the first coat didn’t harden properly or you simply want to add a second coat, you can add a second coat.
- Wait 24 hours before you touch the jerkbaits to add a second coat. Lightly sand the coating with waterproof sanding paper to roughen the surface so the second coat will stick better to the first one. Clean the surface with a moist piece of cloth. You will know when to stop sanding when the surface becomes dull and the gloss disappears. Don’t use a piece of cloth with distinct fibers in it. Again, hang the bait to dry and once it has dried, repeat the process as mentioned above.
- A second coat can be necessary for the reasons mentioned above but don’t exaggerate. It really isn’t necessary to add more than two coats.
These are the questions that I get asked the most. Should you encounter a different problem and you don’t know what to do about it, feel free to email me at dirk@lurebuilding.nl If I can help you, I will add the solution to this text.
With many thanks to Dirk (Divani)
.....Regards.....Andy.....
Last edited by Andy Macfarlane on Thu Feb 19, 2009 7:26 pm; edited 2 times in total
Andy Macfarlane- Posts : 1879
Join date : 2008-08-13
Location : Glasgow
Re: Lure Making
![]() Andy Webster Thu Feb 19, 2009 7:19 pm
Andy Webster Thu Feb 19, 2009 7:19 pm
Not that I am planning on building 100 lures you understand. But if it is any good I might get a price for it to help with the wallpaper.
Andy Webster
_________________
Andy Webster
www.pikeangler.co.uk

Andy Webster- Posts : 1189
Join date : 2008-08-03
Age : 54
Location : Doncaster -
Re: Lure Making
![]() Andy Macfarlane Thu Feb 19, 2009 7:24 pm
Andy Macfarlane Thu Feb 19, 2009 7:24 pm
.....Andy.....
Andy Macfarlane- Posts : 1879
Join date : 2008-08-13
Location : Glasgow
noodle- Posts : 1385
Join date : 2008-08-29
Age : 48
Location : nwest england -
Re: Lure Making
![]() nickcarpy Thu Feb 19, 2009 8:49 pm
nickcarpy Thu Feb 19, 2009 8:49 pm
 but no tootal they know what there on with lures so take there advice mate
nickcarpy- Posts : 1717
Join date : 2008-11-03
Age : 51
Location : hatfield doncaster
Re: Lure Making
![]() tootall Fri Feb 20, 2009 8:04 am
tootall Fri Feb 20, 2009 8:04 am
Very good info - cheers
tootall- Posts : 1339
Join date : 2009-01-29
Age : 47
Location : Beverley, East Yorkshire
nickcarpy- Posts : 1717
Join date : 2008-11-03
Age : 51
Location : hatfield doncaster
Re: Lure Making
![]() MAD BAD ANGLER Fri Feb 20, 2009 7:39 pm
MAD BAD ANGLER Fri Feb 20, 2009 7:39 pm
_________________
SOON THE WHOLE WORLD WILL KNOW MY NAME.

MAD BAD ANGLER- Posts : 1587
Join date : 2008-08-27
Age : 56
Location : thorne, DONCASTER
Re: Lure Making
![]() Andy Macfarlane Fri Feb 20, 2009 8:21 pm
Andy Macfarlane Fri Feb 20, 2009 8:21 pm
MBA, that's handy info.
If I had the space, I'd make lures myself but as things are at the moment, I can't but that's not to say that some day I won't. I can make the small stuff, like spinners etc. on the floor in front of the telly but wooden baits need a room or a shed to work in.
.....Regards.....Andy.....
Andy Macfarlane- Posts : 1879
Join date : 2008-08-13
Location : Glasgow
Re: Lure Making
![]() noodle Fri Feb 20, 2009 9:43 pm
noodle Fri Feb 20, 2009 9:43 pm
one to avoid so far is yew so much hard work trying to shape the stuff and yes i know its a soft wood but its tough
ash is lovely to work with for lures but tends to need a fair bit of lead beech less so oak is ok but doesnt seem to work to well for me
as for sourcing timber keep your eyes on the local recycling places for dinner tables etc made from things like beech mahogony etc well cheaper (and Eco friendly
noodle- Posts : 1385
Join date : 2008-08-29
Age : 48
Location : nwest england -
Re: Lure Making
![]() esoxjeff Sat Feb 21, 2009 8:16 pm
esoxjeff Sat Feb 21, 2009 8:16 pm
i used to make mine at work in lockers.
it was a constant 80c
one for cutting and glueing
one for carving and sanding.
one for painting and finishing.
before shift start,snaptime and end of shift,
esoxjeff- Posts : 1171
Join date : 2008-09-09
Location : Doncaster
Re: Lure Making
![]() tootall Wed Feb 25, 2009 10:16 pm
tootall Wed Feb 25, 2009 10:16 pm
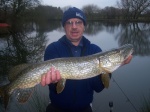
Hopefully it'll be ok and catch me a fish or 2.
What do you reckon?


tootall- Posts : 1339
Join date : 2009-01-29
Age : 47
Location : Beverley, East Yorkshire
Re: Lure Making
![]() adie1200 Wed Feb 25, 2009 10:24 pm
adie1200 Wed Feb 25, 2009 10:24 pm
Adie

adie1200- Admin
- Posts : 3757
Join date : 2008-11-05
Age : 66
Location : Doncaster -
Page 1 of 2 • 1, 2 ![]()
» First attempt at lure making!
» Lure making question.
» Found Lost Lure
» new lures. had ago at making some
PikeAngler :: Fishing :: Pike Fishing
|
|
|